Updated: About WES Digital Badges
Wednesday | December 11, 2019 | by WES Advisor

When you purchase the WES International Credential Advantage Package (ICAP) in connection with your credential evaluation, you qualify for a WES Digital Badge. WES has partnered with Credly’s Acclaim, a leading digital credential service provider, to offer digital badges free of charge to qualified recipients.
Ready to get started? Create an account now and select the WES ICAP package.
What is a digital badge?
A WES Digital Badge is a web-enabled version of your credential evaluation, which means that it can be verified online—instantly. You can easily display and share your badge for maximum visibility and recognition.
Specifically, the WES Verified International Academic Qualifications badge:
- Confirms WES has verified and evaluated your educational credentials
- Confirms that your credentials were awarded by a duly recognized institution
- Provides a U.S. or Canadian equivalency for your credential
How can you use your badge?
You can share your badge in your email signature, on your digital résumé, and on your social media profiles (such as LinkedIn, Facebook, and Twitter). This provides real-time, verified credentials to everyone, instantly, online.
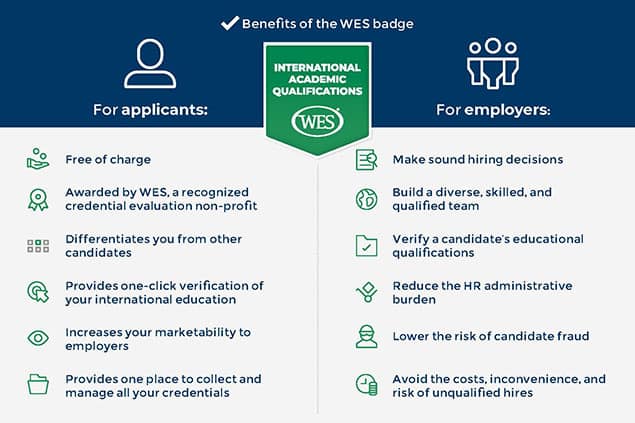
The image below lists additional benefits of digital badges for applicants, as well as those who view the badge.
How do you claim your badge?
Here are the step-by-step instructions for claiming your badge:
- When your badge is available, you will receive an email from WES. Click the Claim My Badge button in that email.
- Within 24 hours, you will receive a second email from Credly’s Acclaim. This email will notify you that your badge is available. Click the Accept Your Badge button.
- You will then be taken to Credly’s Acclaim website to create an account. Your first name, last name, and email address should be filled in automatically. If not, create an account by entering your information.
- Select your country of residence and create a password, then click the Create Account button.
- After you create your account, you must click the I Accept button to agree to the website terms and conditions.
- You will receive a confirmation email to confirm the address you provided. Check your email and click Confirm My Email to finish setting up your account.
- After confirming your email, you will be taken to Credly’s Acclaim sign-in screen. Enter your email and password to access your account.
- You will be taken to a dashboard that houses your badge (or badges). Click on the badge you want to claim.
- You will be taken to a page that shows your badge, its criteria, and the evidence link. Click the Accept Badge button at the top of the page.
- A Badge Settings screen will pop up. Select your preferred options and click Save Settings.
Watch this video to see step-by-step instructions for claiming your badge:
How do you display your badge?
You have many options for sharing your badge. You can share it on social media platforms like LinkedIn, Twitter, Facebook, and Xing. Or, you can share it directly, via email.
Here are a few other ways to share your badge:
- Get a custom URL
- Request a code that will allow you to embed your badge online
- Choose a direct download
Here’s how to display your badge on LinkedIn:
- When you are ready to share your badge online, log in to your Acclaim account and click on your badge in the Dashboard.
- Click the Share button at the top of the page.
- On the Share Your Badge page, click the LinkedIn icon, then click the Connect button.
- To allow you to grant permission to share, a new tab will open; enter your LinkedIn username and password.
- You must give permission for Credly’s Acclaim to display the badge on your LinkedIn profile. Click Allow to continue.
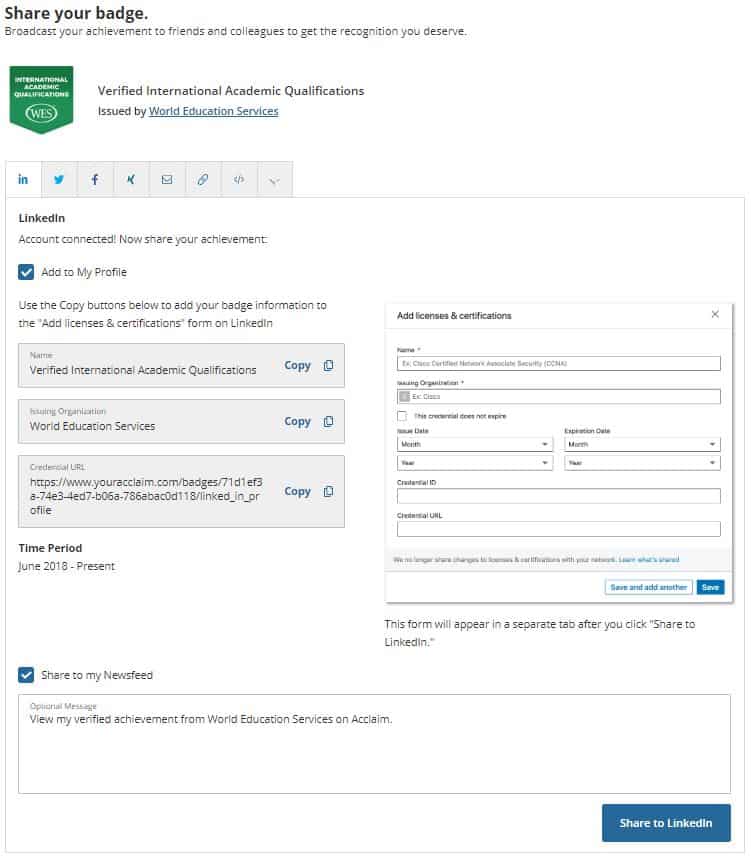
- A form will appear providing you with shortcuts to copy information that you will then paste into an Add licenses & certifications form on LinkedIn (see screenshot below). Click the Share to LinkedIn button at the bottom of the page.
- Next, on the Acclaim tab in your browser, click the Copy link next to the badge name, then paste it into the Name field on LinkedIn.
- Repeat this copy and paste process for the Issuing Organization, Credential URL, and Time Period fields.
- Once you have pasted all the information from the Acclaim site to the LinkedIn form, click the Save button.
That’s it, your credential is now displayed on your LinkedIn profile!
The following video shows you how to display your badge on LinkedIn:
How do you get support if you need it?
If you have not received your badge within 24 hours of opting in, try the following:
- Check your spam/junk mail folder for the badge email from World Education Services via Acclaim ([email protected]) or search your inbox for “Acclaim” or “Credly.”
- Visit the Acclaim website and create an account. Be sure to use the same email as you use on your WES account. Once you log in, you will automatically see your badge there.
- If you still do not see your badge within one week of receiving your credential evaluation report or need support, you can contact us or visit the support page.
Note: By opting in to the badge program, you agree to the WES Privacy Policy and allow WES to share your information with Credly’s Acclaim.
Related Reading

